From Blender to Natron with Cryptomattes and AOVs
· By Johnson
Since version 2.8, Blender has supported the cryptomatte standard for generating compositing masks in Cycles. And more recently, since Blender 2.92 Alpha, this feature has been expanded to support Eevee along with support for Shader AOVs. If you come from a VFX background, you might've used cryptomattes or AOVs before. But if you're a long-time Blender user like me, this feature is probably new to you. So in this guide, I'm going to walk through how to use cryptomattes and AOVs to your advantage in Blender. Whether you're an artist doing VFX work, product development, or any other kind of Blender project, these tools could be useful to you!
The cryptomatte standard allows for fast selection and manipulation of scene elements after rendering through mattes to save time and add flexibility. The main advantages of cryptomattes over regular object IDs is reliability across workflows and how cryptomattes are automatically generated at render-time while requiring little input from the artist. Furthermore, cryptomattes are compatible with most compositing applications (Nuke, Fusion, Natron, etc.) and many other applications thanks to work by Jonah Friedman and Andy Jones of Psyop. Cryptomattes also support both motion blur and depth of field, two essentials for VFX work that regular object IDs often lack.
AOVs (Arbitrary Output Variables) on the other hand, are render layers that allow any part of a material node graph to be saved for processing later. AOVs are useful when you need to do more than mask an image and need to have real texture/shading information on hand for compositing.
For this guide, I'm going to walk through using Blender with Natron to process images. However, the concepts apply to almost any compositing engine, even Blender's compositor. Hopefully you'll be able to gain a better understanding of how cryptomattes and AOVs work and why they are so useful for render pipelines.
Creating Cryptomattes in Blender
First, let's have a look at using a cryptomatte for compositing. To enable cryptomattes, access View layer properties → Passes → Cryptomatte and select which properties you want to generate mattes from. The "Object" setting will create a matte for each object, "Material" will create a matte for each material in a scene (a useful way to separate parts of a single object), and "Asset" will create a matte for each parent group of objects. For example, if you have multiple linked assets of the same type in your scene.
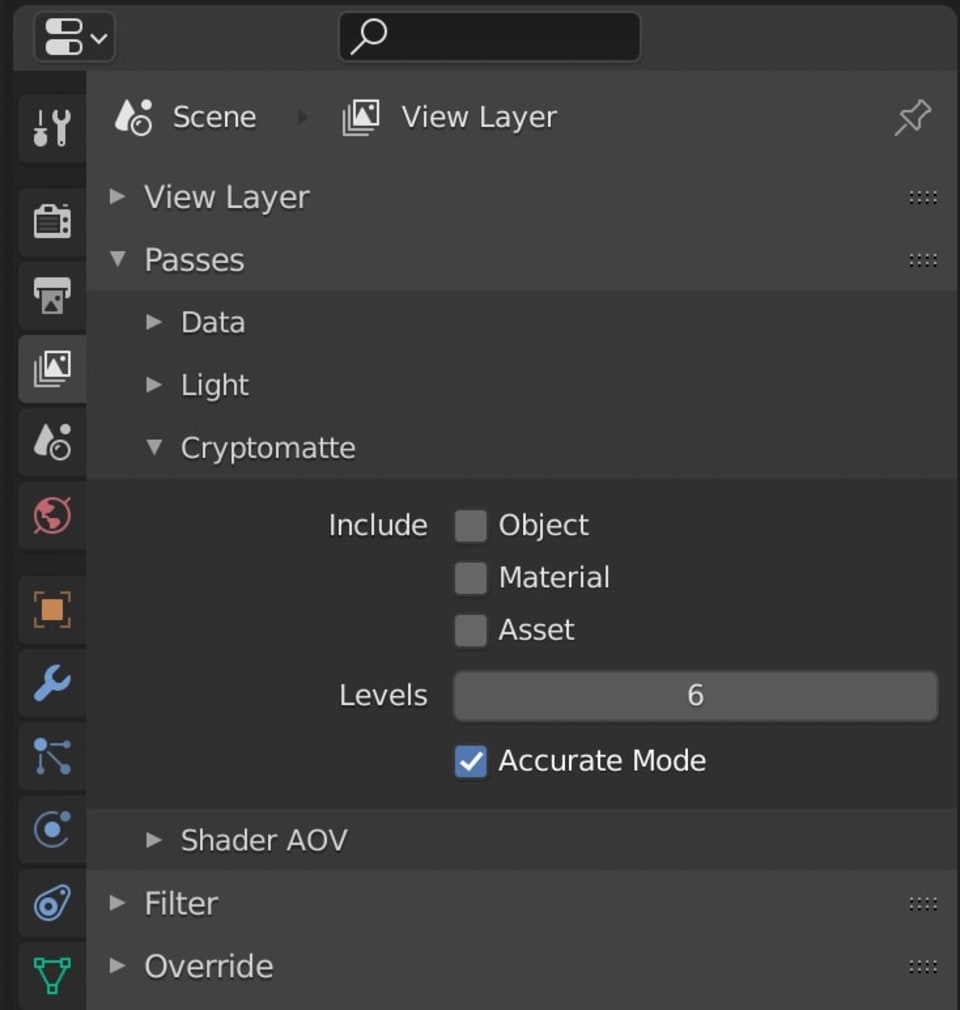
The other settings have to do with how well the renderer generates each matte. Since cryptomattes are generated at render-time and calculate effects such as motion blur and depth of field, it's easy for multiple mattes to overlap. Because of this, accuracy quickly becomes a factor for how well each matte is produced.
Unlike traditional ID mattes, cryptomattes generate a unique ID number for each object (aka. matte) per pixel and store this information in a way that can easily be read by other software. This is especially useful in heavy scenes with transparent objects and motion blur where it's likely for there to be many mattes within the same pixel.
Getting back to how this relates to Blender, you can tell the renderer to only process a certain number of mattes per pixel using the "levels" setting. The default is 6, which is plenty for almost every use case, but it might be useful to lower this number to save render time if you're rendering a simple scene.
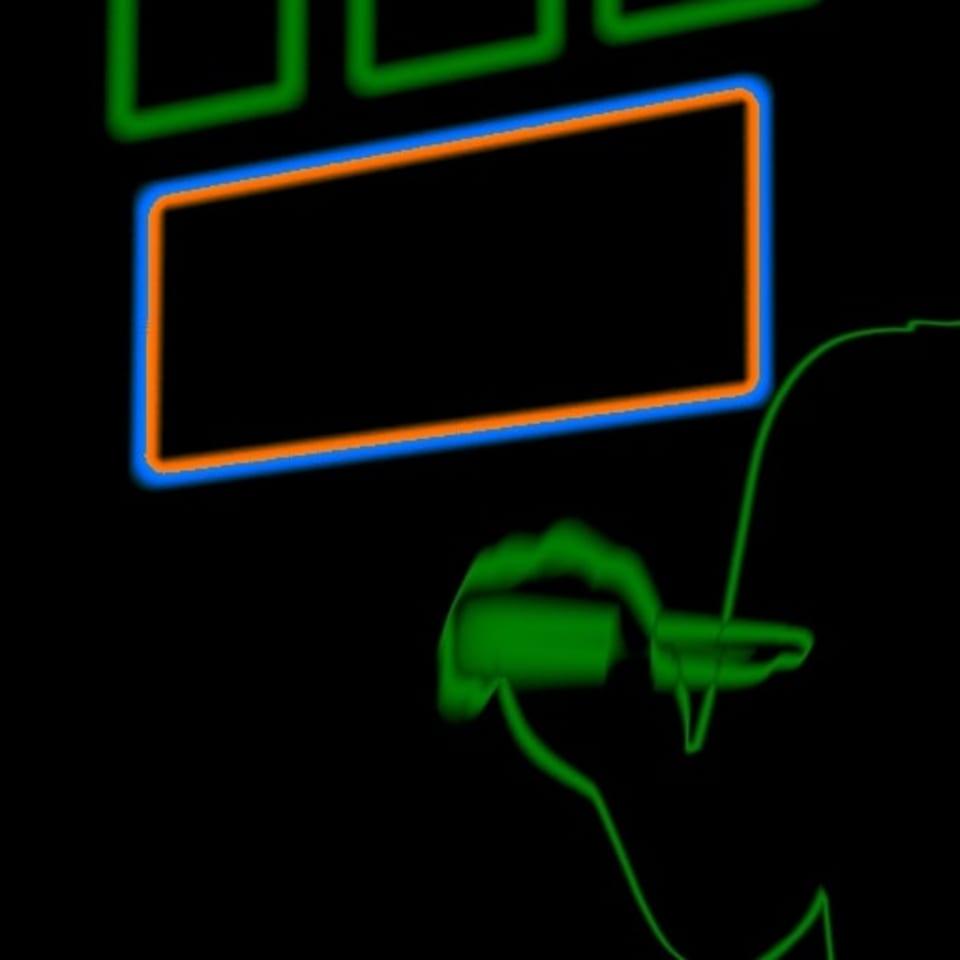
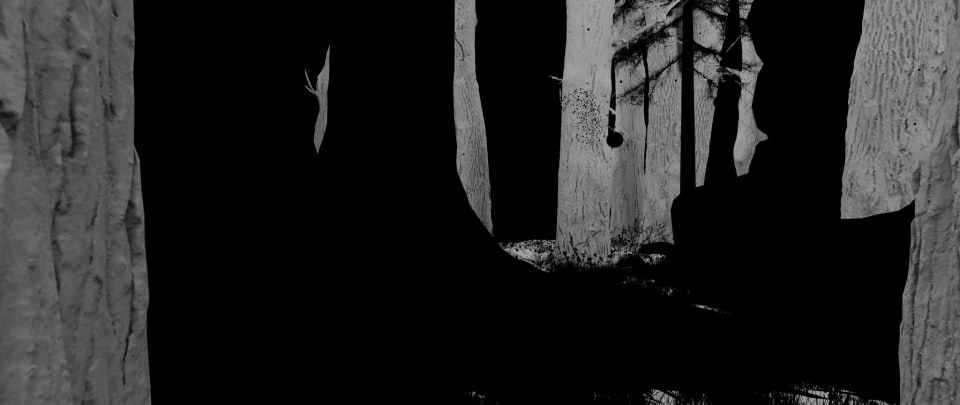
There is also an "accurate mode" checkbox which toggles how well the renderer differentiates between each mask. Currently, this feature is CPU only, so If you're not dealing with depth of field, motion blur, or intricate masks, this setting is likely not worth using if you plan to render with a GPU. But as you can see below, it does make a difference.

After enabling one of the matte types, make sure to set your output format to "Multi-layer OpenEXR" so that the rendered frames include all the render layer info produced, including the cryptomatte. If you're using a more complex saving scheme, you can also use the "cryptomatte" output of the render layer node in Blender's compositor to route the mattes wherever you need them. You can even save mattes as traditional black/white mattes using the cryptomatte node!
Creating Custom Shader AOVs
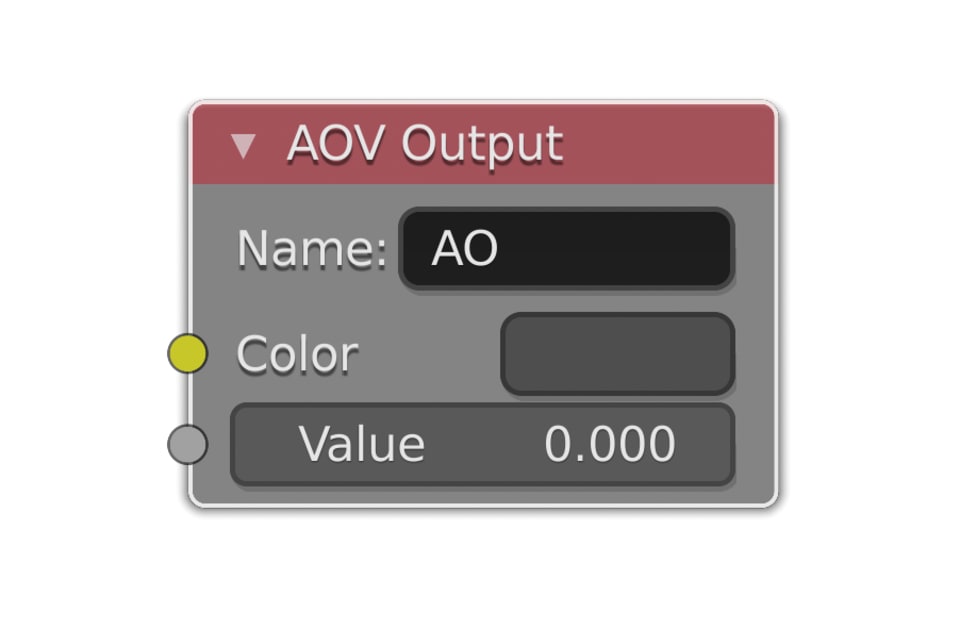
So what if you need to reference something other than an object or material for editing in post? That's when Shader AOVs come in handy. Shader AOVs or "Arbitrary Output Values" allow any part of a material node tree to be sent to a separate render layer. For example, if I wanted to be able to adjust the amount a dirt/AO texture appears I could send it to an an AOV layer and adjust it later in compositing.
To create an AOV, go to View layer properties → Passes → Shader AOVs and add a new AOV with a name. Next, just add an AOV Output node to your material and route either a color or value to the node and type in the name of the AOV layer. Now when you hit render, a new pass with your chosen name will appear in the compositor.
Using Cryptomattes in Natron
The real power of cryptomattes is how easy it is to mask and modify parts of a render in your composting application. Doing this on the fly without the need to re-render is invaluable for art direction and VFX work. As an example, we'll be using the open-source software Natron for modifying our image. These same concepts apply to AOVs as well and utilizing both AOVs and cryptomattes is a great way to push the envelope farther.
You can download Natron from their website here. Next, you'll need to download and install the Cryptomatte_Keyer python plugin file for Natron in the plugins folder of the app:
| Windows: | \Program Files\INRIA\Natron\Plugins\PyPlugs |
| OSX: | /Library/Application Support/Natron2/Plugins/PyPlugs |
| Linux: | [/usr/share] or [INSTALLATION DIRECTORY]/Natron2/Plugins/PyPlugs |
Now you can fire up Natron and get started! If you haven't used Natron before, it might be worth checking out Sean Kennedy's intro to Natron here.
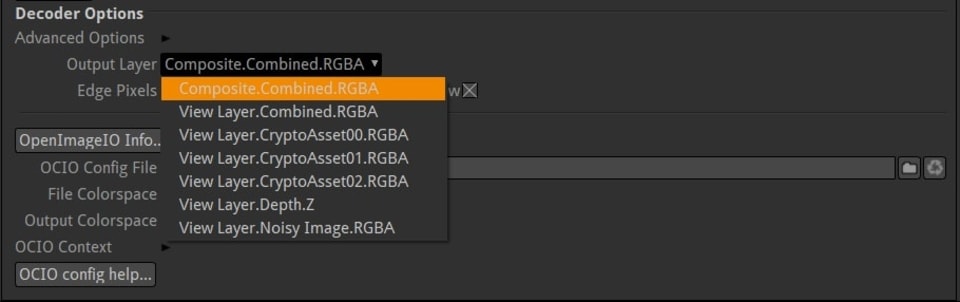
First, import your frame(s) using a read node in the node graph and connect it to a viewer node. At this point, if you want to verify that the cryptomatte has been included with your render files, you can use the "Output Layer" drop-down in the read node's decoder options to select and preview the cryptomatte (remember to change it back before compositing!). If you don't see any layers labeled as a cryptomatte in the drop-down, make sure to check your render/export settings in Blender.
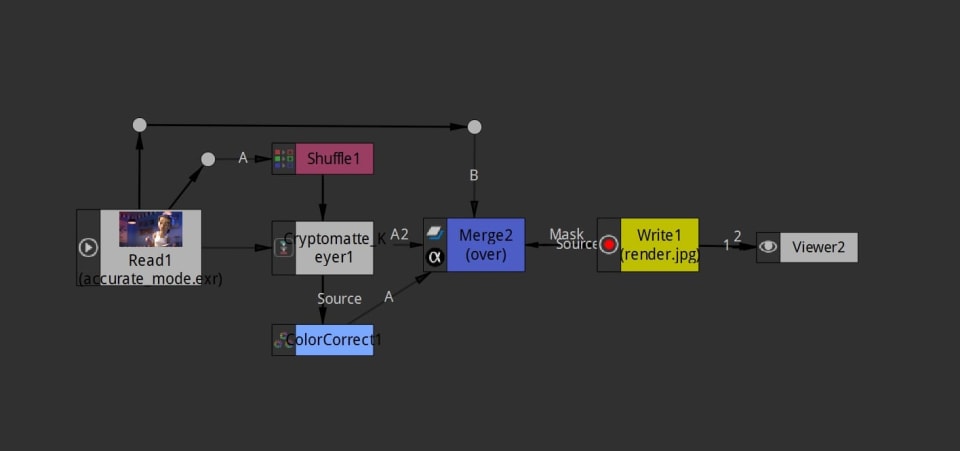
Next, you can set up the node graph. Below is an example of a quick way to color correct a particular object using a cryptomatte. The read node brings in the image, then the image is masked with a cryptomatte node, color corrected, and finally recombined with a merge node.
Shuffle Node: Selects the right layers for nodes down the chain to process. By default, Natron will whatever output layer is selected in the read node, but these layers can be "shuffled" with this node without adding a separate read node.
Cryptomatte node: The cryptomatte node allows you to combine up to 15 different mattes/objects from the cryptomatte into a single mask that can either be outputted directly or, in this case, outputted as a masked version of the image, which can be processed independently.
Color Correction Node (or other processing): At this point in the chain, you can process the masked part of the image however you need to. In this case, I changed the color of the back wall using the color correction node. But whatever your needs are, you can processes the masked area here.
Merge Node: The merge node adds the changes you've made using the masked part of the image back onto the original image. Source A will appear over top of Source B by default. You can add the type of node quickly by pressing M.
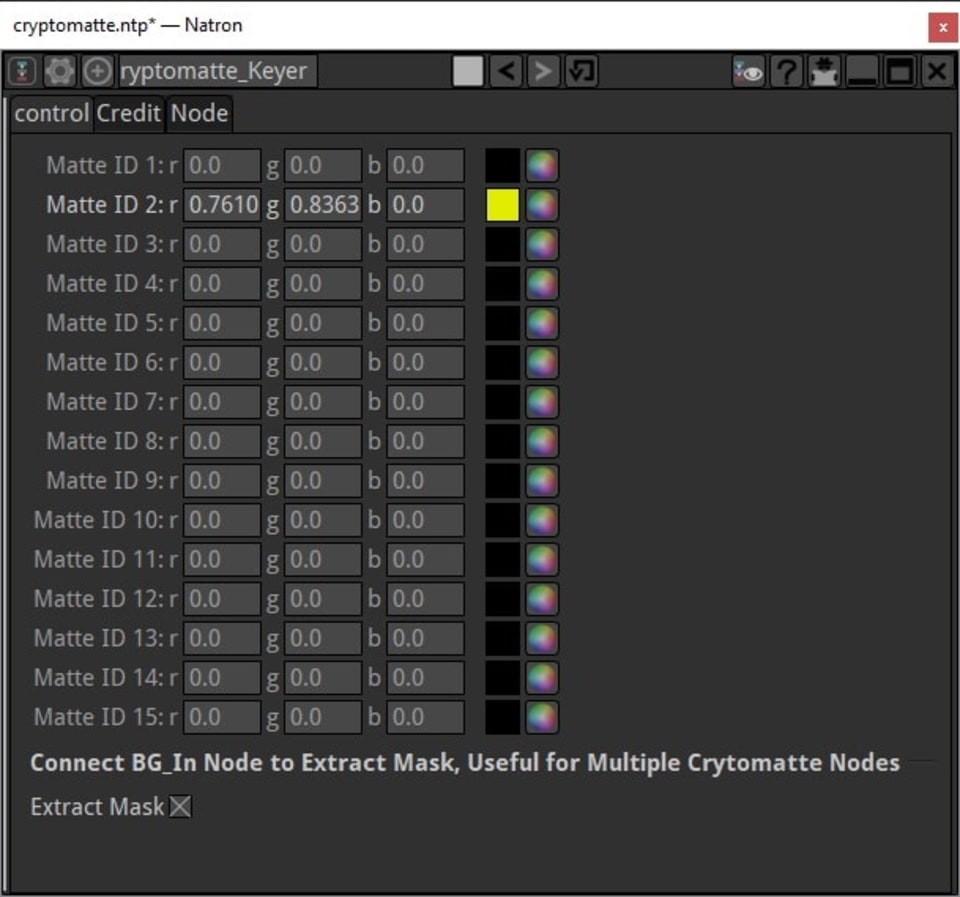
Lastly, for this node graph to work, you need to select the matte(s) you would like the cryptomatte node to mask for you. To do this, select the node and use the eyedropper to select a color for one of the 15 Matte IDs. To select the matte, you need to temporarily add a viewer node connected to the Shuffle node and eyedrop from here.
Each color or "ID" you select will be added to the masked image. By default, the node will output a black & white mask, so select "Extract mask" to utilize the BG_in input of the node to generate a masked version of the original image.


The last thing to do is set up your output settings using a Write node and then rendering your frames to file using the shortcut F5.
Wrap-up
Cryptomattes and AOVs are a great addition to Blender's toolset and greatly increase flexibility for compositing and post-processing renders. Being able to change and modify render elements after rendering has already helped me out with plenty of my own projects.
Here at Blendergrid we already support rendering cryptomattes and Shader AOVs in Cycles through Multilayer OpenEXRs and Blender's built-in compositing engine. How do you plan to use cryptomattes or AOVs in your workflow? Leave us a comment below! We always love hearing from fellow Blender users.