Blender Render Optimization - Noise Threshold
· By Richard
I'm planning to cover a bunch of the Blender render settings in a few different articles. The main goal will be render optimization.
With render optimization, I am talking about: Reducing render time and/or cost while still getting a high quality render.
In this first article I'll cover the Noise Threshold setting.
Here is a screencast where I talk about it a bit and demo a practical example:
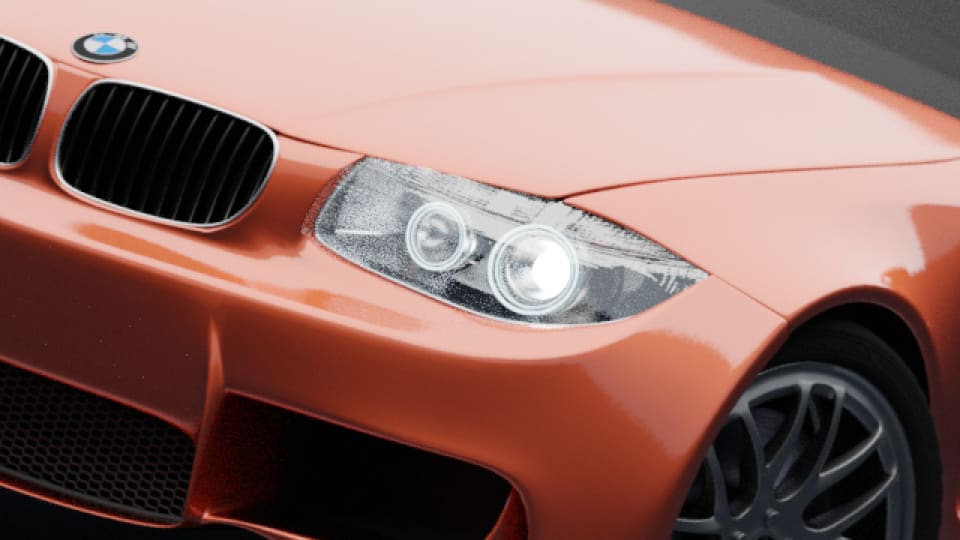
Mike Pan's BMW scene is a good example scene because there are a lot of different shaders. Some shaders need quite different sample counts.
Some areas of the image need very few samples to become clear of noise. Other areas need a lot of samples.
When we use the same amount of samples for every pixel, we can see that the headlight is still quite noisy. The rest of the image already looks clean for the most part:
If you want to get a clean render, the naive way would be to increase the samples. You would find a value that makes the headlight area finally clean up.
This wastes a lot of render time, because most of the image doesn't need that many samples to become noise free.
Say this headlight would need 4x as many samples to get noise free. If you increase the samples by 4x for this area, render time will likely also go up by 4x as well. Not cool.
I ran some tests increasing the sample count and measured the render time. It's safe to say this is a linear increase.
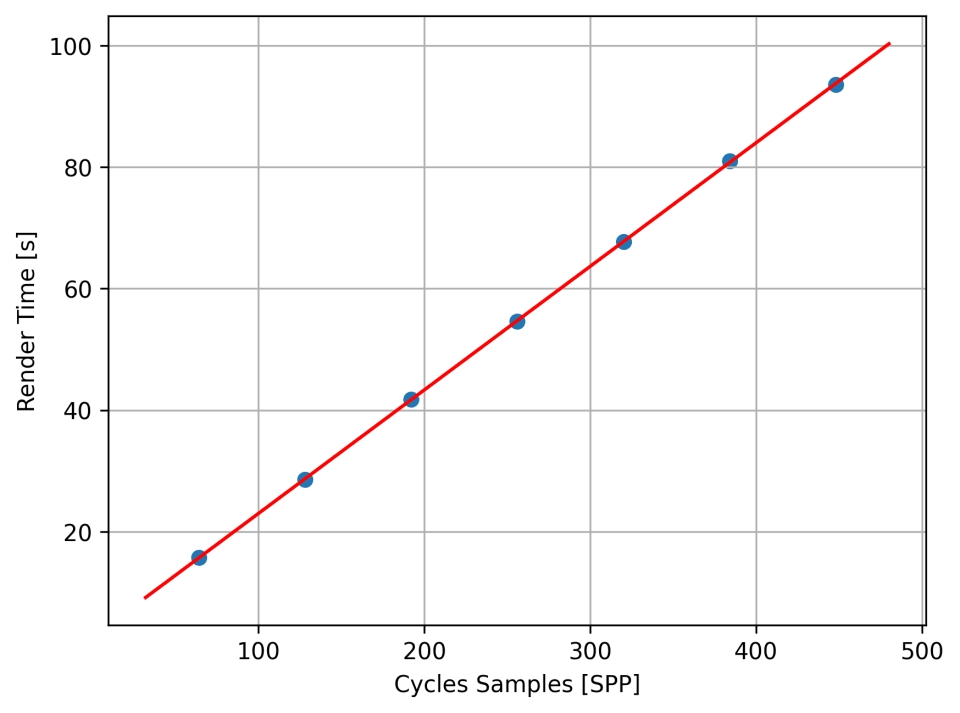
(The only constant time is scene initialisation time and things like compositing. These do not increase as sample count increases).
Adaptive Sampling is a more intelligent way of solving this issue. Blender can detect the noise level, and use more samples targeted to the areas that need it.
The way we can tune this feature is with the Noise Threshold.
As you know, when you render with Cycles, the image starts off very noisy and gets clearer over time. The longer you wait, (the more samples you let Blender take) the less noisy the image becomes.
I'm pretty sure Blender measures noise level per individual pixel. (So it's not just measuring one noise value of the entire image.)
We let Blender stop sampling pixels when their "noise" drops below the Noise Threshold. (Which we've chosen)
This way, Blender adaptively samples the image and stops when the noise has cleared up enough.
This is especially useful if only a small part of your image requires a lot of samples to get clean. (And the majority of the image is clean with very few samples)
According to the Blender Documentation about Adaptive Sampling: this allows for a more evenly distibuted noise level across the image. Which makes sense.
Let's look at the BMW scene again, and we let Blender choose the amount of samples to
get the noise level below 0.002. (Noise Threshold set to 0.002, which is very low).
This is how it distributes the samples:

As you can see, the headlights get the most samples, because they are still noisy while the rest of the image is clean.
(You can also see that the edges get a bit more samples. It might not be clear if scene detail causes high contrast, or if it's noise)
Tuning the settings
We can see that using the Noise Threshold to turn on Adaptive Sampling is useful. How do we choose the right settings?
It's important to understand how sampling works and what these settings do. This way you can make good decisions on which setting to increase when.
The three settings that are important are:
- Noise Threshold
- Max Samples
- Min Samples
We're talking about Noise Threshold. But to give Blender the freedom (or restrict freedom) to choose the sample count, we use the Min and Max Samples.
The Min Samples (as the name suggests) gives you control over the min. samples every pixel should get. Regardless of noise level.
So if you want to give Blender all the freedom to decide when it's time to stop sampling a pixel (and save render time) you want to set this to a low value.
Setting it to 0 however, will make Blender choose a value based on the Noise Threshold.
So if you want control, set it to a value other than 0, if you don't want to bother, you
can leave it at 0 (the default) and let Blender use a "one size fits all" approach.
The Max samples as the name suggests allows you to set a sample count that no pixel should ever exceed. Even if there is still a bunch of noise that is above the Noise Threshold, Blender will respect this setting and stop sampling.
If you want to allow Blender to choose a sample count for every pixel based on the noise level, you can use a high value.
Practically speaking, I would recommend setting the Max Samples to a sensible value. If
you know you can get clean images with 2048 samples (but the render is slow) I would set
the max samples to 2048. You should make Blender stop regardless of noise if any pixel
ever reaches this value.
This way, the Noise Threshold is only used to stop sampling earlier in areas that are already clean. This will save render time.
Then we have the Noise Threshold itself. Again, the way to think about this is that you start of with a few samples, and a very noisy image. As you increase samples the noise goes down.
Blender measures this noise, and when this noise value reaches below the Noise Threshold Blender stops sampling. (when it uses enough samples)
It might be useful to get an intuition on the amount of samples vs. this noise level.
I have measured a range of different Noise Threshold levels and the render time. We've seen before that render time has a linear relation with the sample count. We can assume that a doubling in render time as a result of changing the Noise Threshold has resulted in a doubling of samples.
I measured noise vs. render time as follows: I varied the noise threshold, and let
Blender render "as many samples it wanted" to get down to that noise level. I did this
by setting some ridiculous Max Samples setting of 8192^2 (which is 67108864).
This is the result:
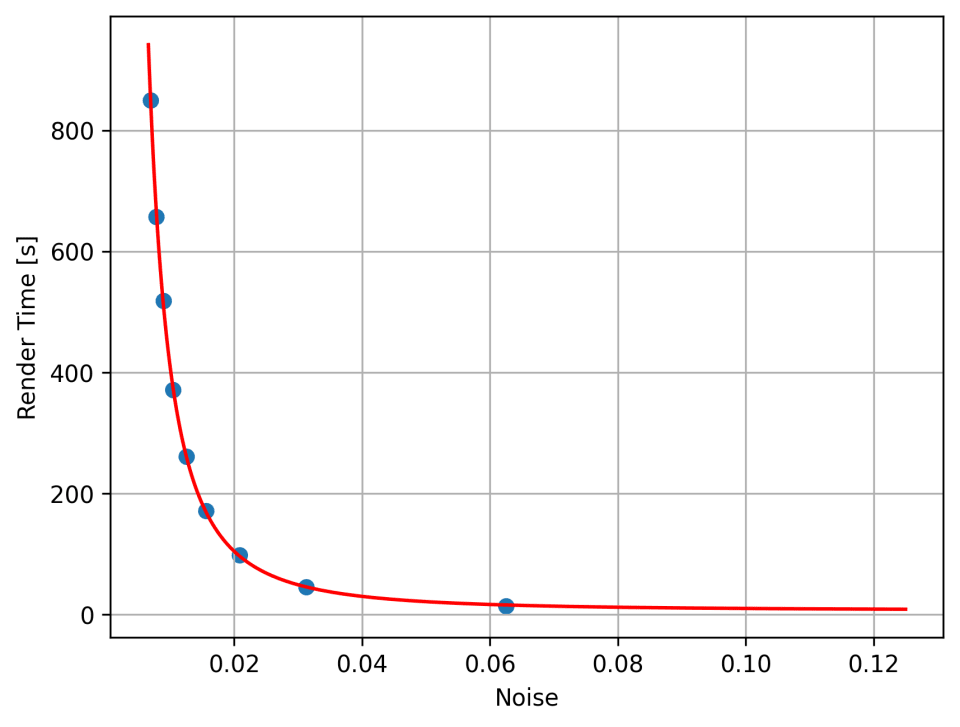
I fitted the red line through the points with formula:
render_time ∝ 1 / noise^2
Which seems to fit quite tightly.
Since there is this 1 / noise going on, I thought of a quantity that describes the
inverse of noise, i.e. "clarity". I found this useful because noise decreases as render
time increases. So the inverse might be more intuitive to wrap your head around.
So clarity, the inverse of noise will be defined as:
1 / noise
Now the relation between samples and clarity is:
render_time ∝ clarity^2
And when we plot the render time against clarity we can see the parabola shape of this relation:

I hope this gives a bit more of a picture of what this "noise" quantity means in Blender. Because that's what you rely on when tuning the Noise Threshold.
Tuning the render settings: In practice
In practice you might not always want to consider the maths involved and all these formulas and graphs.
For tuning all three settings, I recommend turning off any Denoising settings to see the raw sampled pixels and examine the amount of noise the render has.
So here is what I recommend for tuning the three settings:
Noise Threshold
To find a good value for Noise Threshold, we have to give Blender the freedom to use it.
This means the range of possible Sample Counts has to be large. So set the Min Samples
to something low like 4. Set the Max Samples to something high, for example in the
vicinity of 10,000.
In Figure 2 we can see that render times explode as Noise (Threshold) goes down too low. So be careful with starting with values too low.
Start with high values around 0.1 - 0.2. This will likely result in a pretty fast but
noisy render. Now lower the noise threshold in small steps and see what it does to the
amount of noise. I would not go lower than 0.004 - 0.002. The default of 0.01 that
Blender uses is usually low enough.
Once you find a setting with an acceptable amount of noise, that's all you need.
Min Samples
To find the minimum number of samples you will allow Blender to choose. I recommend turning off the Noise Threshold and just plug in a constant Sample Count to see what it does.
Try different sample counts and find the value where the first areas of the render start to clear up and become "clean enough". Use this value for the Min Samples.
Max Samples
Again tune this setting with the Noise Threshold turned off.
Identify the most noisy area of your render. You might also have to search across the timeline if you're working on an animation.
You can render a border region of this area to speed things up. Find the amount of samples you need to clean the most noisy area up. When you find a value where you think things are clean enough, use this value for the Max Samples.
When you've tuned all three settings, you can turn the Noise Threshold back on for a pretty balanced render between speed and quality.
Mileage may vary with how much benefit you get from Adaptive Sampling. But renders with small noisy areas like the headlights in the BMW scene will definitely improve from adaptive sampling.